This article contains a list of conditioning drills that you can use during your sessions.
You should not use all these drills in one single practice. I recommend you also not to use any of these drills more than 10 minutes per session!
Pain/Killer Shuttles
If you want your players to start hating you then you should use this drill as often you can 🙂
The shuttles run or killer shuttles as some people prefer to call them are one of the most painful football training drills that you can find.
However, it is very effective if performed with effort and focus. This drill is ideal at the end of the practice because it will squeeze the last piece of power from your players.
The players need to perform the drill 5-10 times before resting for 2 minutes. The amount of sets depends of course on how young your players are.
If you are coaching players younger than 18 years old you should try to keep the amount of sets to 5.
Here are the instructions for setting up the Killer/Shuttle Runs:
1. Place 4 cones 10-15 yards apart.
2. The players should start from cone 1, run to cone 2 and back to cone 1, then run to cone 2 and back to cone 1, run to cone 3 and back to cone 1 and finally run to cone 4 and back to cone 1.
3. The players should run at maximum speed.
4. Take a rest of 20 seconds during the sets.
5. Players should perform at least 5 sets (depending on the age).
Step Jumps
The step jumps drill can be performed in the middle or at the end of your practice session.
You should avoid implementing it in the beginning of your practice as players need to warm up properly before participating in this drill.
Here is how to perform the Step Jumps drill:
1. Instruct your players to place a cone or ball in front of them.
2. Tell them to place themselves beside the cone or ball.
3. Tell your players to start to jump vertically but also laterally off the ground and over the cone/ball.
4. The players should land on both feet and then jump back in the other direction.
5. Each set should last about 60 seconds.
6. Your players should perform 4-8 sets depending on their age.
Sick & Sack Runs

This drill should be performed in pairs. Tell your players that they will be competing against their partner.
To make this drill more interesting you could set up a competition where the losing player needs to perform 40 sit-ups as a penalty.
Here is how to set up the drill:
1. Divide your team into 2 equal groups.
2. Instruct each of your players to find a partner in the other group.
3. Place 5 cones 10 yards apart.
4. Your players should perform at least 5 sets depending on their age.
5. Your players may rest between the sets by jogging back to their respective files.
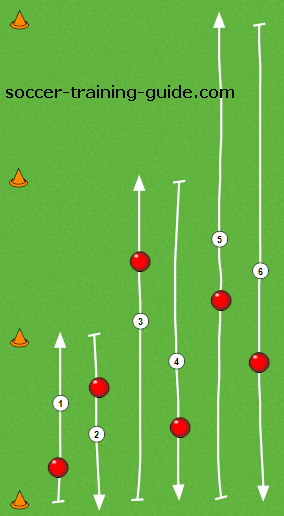
Lost Runs
I call this drill for lost runs because once you start to perform it you actually feel lost.
However, this drill is both fun and effective for developing your players overall condition.
Here is how to set up the drill:
1. Set up the drill by placing 6 cones on the same way like on the image below.
2. Players should try to run at maximum speed and perform at least 4 sets.
3. They should rest by jogging back to the file between the runs.
Summary
You should develop your players’ condition during the whole season. However, it is important to put extra emphasis on conditioning 2-3 months before the start of the season.
This is the most critical period and a player with a poor pre-season behind him will rarely perform well during the competition.
Ask yourself: what’s the point of having a player with great soccer skills when he can’t run constantly more than 20 yards?
The soccer drills in this article could be used during your regular season or as a compliment to your pre-season program.